Turn paper, folds and conversation into practical online-safety learning. Each craft includes a decision to practise, not just an object to display.
Make something children can explain, not just display
A paper craft becomes an online-safety activity when it helps a child make and explain a decision. A beautifully coloured object is not proof of understanding. This guide offers 10 original, inexpensive makes for home or primary classrooms, with materials, 4 construction stages, a fictional situation and a way to check learning for each.
Start with one activity that fits a real learning need. The timings are planning suggestions, not developmental standards. Adults can prepare pieces, read aloud or accept pointing and drawing. No child needs an account, a device, a personal photograph or a real password. The purpose is rehearsal in a calm setting, never testing children with live scams.
Prepare a small, reusable making kit
Collect scrap cardstock, coloured paper, washable markers, a glue stick, blunt scissors and a short piece of cotton cord for the fan. Adults handle hole-making and difficult cutting. Use large pieces instead of tiny decorations; keep cord short and on the table. Avoid blades, hot glue, magnets and batteries. Choose materials and supervision for the actual group, with precut or tearable alternatives.
The original illustrations show construction, not products you need to buy. Each numbered plate contains stages 1–4. Colours support organisation, but icons and adult explanation carry the meaning too. Make a trial version before class so glue, folds and piece sizes work together.
Learning need | First make to try | Child explains |
|---|---|---|
Rushing into a choice | Decision fan | Why a pause or question is useful |
Sharing and privacy | Audience windows or permission camera | Purpose, audience and permission |
Uncomfortable contact | Help accordion | How to reach another adult if needed |
Transfer to another setting | Mission booklet | The same idea in a new example |
These activities are Cyber Sqool originals. External organisations such as KnowBe4 also publish children's learning resources, while eSafety emphasises supportive adult help. Those references do not certify these makes or establish a partnership.
1. The pause–check–ask decision fan
Suggested making time: 15 minutes.
Materials and preparation: 3 large rounded cardstock rectangles, marker, short cord; an adult prepares one aligned hole.
Make it in 4 stages
Prepare 3 cards in different colours, large enough for a child to hold and point at comfortably.
Draw a pause icon, magnifying glass and conversation bubbles, one on each card. Explain each together.
Align one lower corner. An adult makes a hole through the stack and loosely threads short cotton cord.
Spread the cards into a fan. Check that they turn easily and the cord does not become a loop to wear.
Try the idea: A fictional message offers a rare game item in exchange for a code. The child selects a card and explains a next action without seeing a real link.
Observe understanding: Can the child say what needs checking and which adult can help, rather than simply pick a colour?
Important limit: The fan is a reminder, not a verdict. A familiar logo or exciting gift does not make a request trustworthy.

Original tutorial illustration: stages 1–4 — The pause–check–ask decision fan.
2. Audience windows: who needs to see this?
Suggested making time: 20 minutes.
Materials and preparation: A cardstock square, 4 smaller paper flaps, glue and large icons; use fictional drawings.
Make it in 4 stages
Divide the base into 4 spacious squares, leaving a narrow margin around each.
Prepare 4 flaps with one-person, small-group, globe and question-mark icons.
Glue only the top edge of each flap above a square so it lifts like a window.
Place simple fictional flower and toy drawings underneath; lift a window when discussing an audience.
Try the idea: Who needs a drawing for a classroom display? What changes if a picture also reveals an address? Let the child ask for missing context.
Observe understanding: Look for an explanation involving purpose and audience, including the option not to share.
Important limit: A closed flap does not secure real information. “Small group” is not a guarantee that nobody will forward a picture.

Original tutorial illustration: stages 1–4 — Audience windows: who needs to see this?.
3. The permission camera with a closing shutter
Suggested making time: 20 minutes.
Materials and preparation: A blue rectangle, an orange flap, marker and glue; draw a flower instead of using a person’s photograph.
Make it in 4 stages
Lay out the base and a flap large enough to cover its intended picture area.
Draw a simple camera outline and a square flower picture in the centre.
Glue the flap by its top edge above the picture; leave the other edges free to move.
Practise lifting and closing it. Choose optional symbols or words together to remind everyone to ask first.
Try the idea: An imaginary club wants to use a picture on a private worksheet and then in a public post. Are those the same decision?
Observe understanding: Can the learner ask who is pictured, why the picture is needed and where it will appear?
Important limit: Permission to take a picture is not automatically permission to publish it. The paper shutter cannot undo real online sharing.

Original tutorial illustration: stages 1–4 — The permission camera with a closing shutter.
4. A three-pocket paper inbox
Suggested making time: 25 minutes.
Materials and preparation: 3 paper rectangles, a larger base, glue, marker and fictional message cards with no working links.
Make it in 4 stages
Prepare matching rectangles and a base wide enough to hold them side by side.
Fold the bottom third of each rectangle upward to form a pocket.
Glue the side edges, attach pockets to the base and add pause, magnifier and conversation icons.
Prepare separate cards with a gift, unknown avatar and code symbol. Place them outside the pockets to discuss.
Try the idea: Read a short invented message aloud. Use the pockets to organise possible actions, allowing a message to need more than one action.
Observe understanding: Ask what detail is missing and how to verify it independently. A question is a valid response.
Important limit: An icon alone cannot identify a scam. Do not sort real messages or expose classmates’ accounts during the exercise.

Original tutorial illustration: stages 1–4 — A three-pocket paper inbox.
5. Conversation bubbles that repair a reply
Suggested making time: 15 minutes.
Materials and preparation: 3 large paper speech bubbles, a base strip and marker; an adult can precut the shapes.
Make it in 4 stages
Prepare 3 generous speech-bubble shapes and a strip wide enough to hold them.
Draw a pause symbol on one, a listening ear on another and a small heart on the third.
Glue their lower edges to the strip in a sequence the group can explain.
Keep a separate blank bubble for an invented alternative reply; attach it lightly so it can be replaced.
Try the idea: A fictional teammate makes a mistake. Compare a blaming reply with a specific, respectful suggestion for the next round.
Observe understanding: Can the child rewrite the message without attacking the person, while still expressing disagreement?
Important limit: Kindness does not require staying in an abusive conversation. Adult support takes priority when a scenario becomes harmful.

Original tutorial illustration: stages 1–4 — Conversation bubbles that repair a reply.
6. A help-seeking accordion
Suggested making time: 20 minutes.
Materials and preparation: One long paper strip, 4 large folded panels and simple drawings chosen with the child.
Make it in 4 stages
Fold a wide strip back and forth into 4 panels with an adult helping the creases.
Draw a help symbol on the front and leave the inner panels spacious.
Use simple symbols for a first trusted adult, another adult and a place or method for approaching them.
Open the accordion and rehearse pointing or handing it over; keep real contact details on a separate private copy if needed.
Try the idea: The first adult is busy or does not understand. Practise finding another appropriate adult rather than giving up.
Observe understanding: Can the child show a route to help without explaining every detail of an upsetting incident?
Important limit: This is not a form for collecting disclosures. Never require a child to name a harmful experience in front of the group.

Original tutorial illustration: stages 1–4 — A help-seeking accordion.
7. A profile card with a question on the back
Suggested making time: 15 minutes.
Materials and preparation: A large folded card, marker and an invented animal avatar, not a real classmate’s profile.
Make it in 4 stages
Fold a rectangle into a sturdy card with a clear front and back.
Draw a fictional animal avatar on the front and add decorative shapes without real usernames.
Draw a large question mark inside with space for the learner’s questions.
Open the card while discussing what the front shows and what it cannot establish.
Try the idea: A cheerful avatar says they belong to the child’s school and asks for a private conversation. What do we actually know?
Observe understanding: Listen for separation between appearance, a claim and something independently verified.
Important limit: An avatar can protect privacy and is not itself suspicious. The lesson concerns claims and behaviour, not judging people by appearance.

Original tutorial illustration: stages 1–4 — A profile card with a question on the back.
8. A paper trail for information travelling
Suggested making time: 20 minutes.
Materials and preparation: Large paper footprints, a base sheet and marker; an adult prepares shapes if cutting is difficult.
Make it in 4 stages
Prepare 4 large footprint shapes without small separate toes or loose decorative pieces.
Draw a fictional flower picture on the first and a simple message symbol on each later footprint.
Arrange them across the base to model a picture sent to one person and then forwarded.
Move a footprint to show a new audience and discuss what would need review before the first share.
Try the idea: A picture meant for a project moves into another group. Discuss purpose, consent and asking an adult for removal support.
Observe understanding: Can the child explain why the first audience may differ from the eventual audience?
Important limit: The model illustrates possible movement, not a claim that every image is forwarded or that removal is always impossible.

Original tutorial illustration: stages 1–4 — A paper trail for information travelling.
9. An unfoldable session plan
Suggested making time: 15 minutes.
Materials and preparation: A wide strip, marker and 4 broad sections for a game, pause, conversation and next activity.
Make it in 4 stages
Fold the strip into 4 generous panels so the sequence can be opened on a table.
Draw an activity icon, pause icon, conversation icon and an offline activity chosen by the child.
Add a simple drawn clock to support discussing an agreed finish without setting a universal time limit.
Unfold the sequence and practise an ending phrase and a next activity before using a device.
Try the idea: A game cannot finish exactly when expected. Plan an earlier reminder and a workable stopping point with the adult.
Observe understanding: Can the learner describe the next step and ask for help with a difficult transition?
Important limit: Paper plans do not diagnose gaming problems or replace device controls and family support. Adjust the plan to actual needs.

Original tutorial illustration: stages 1–4 — An unfoldable session plan.
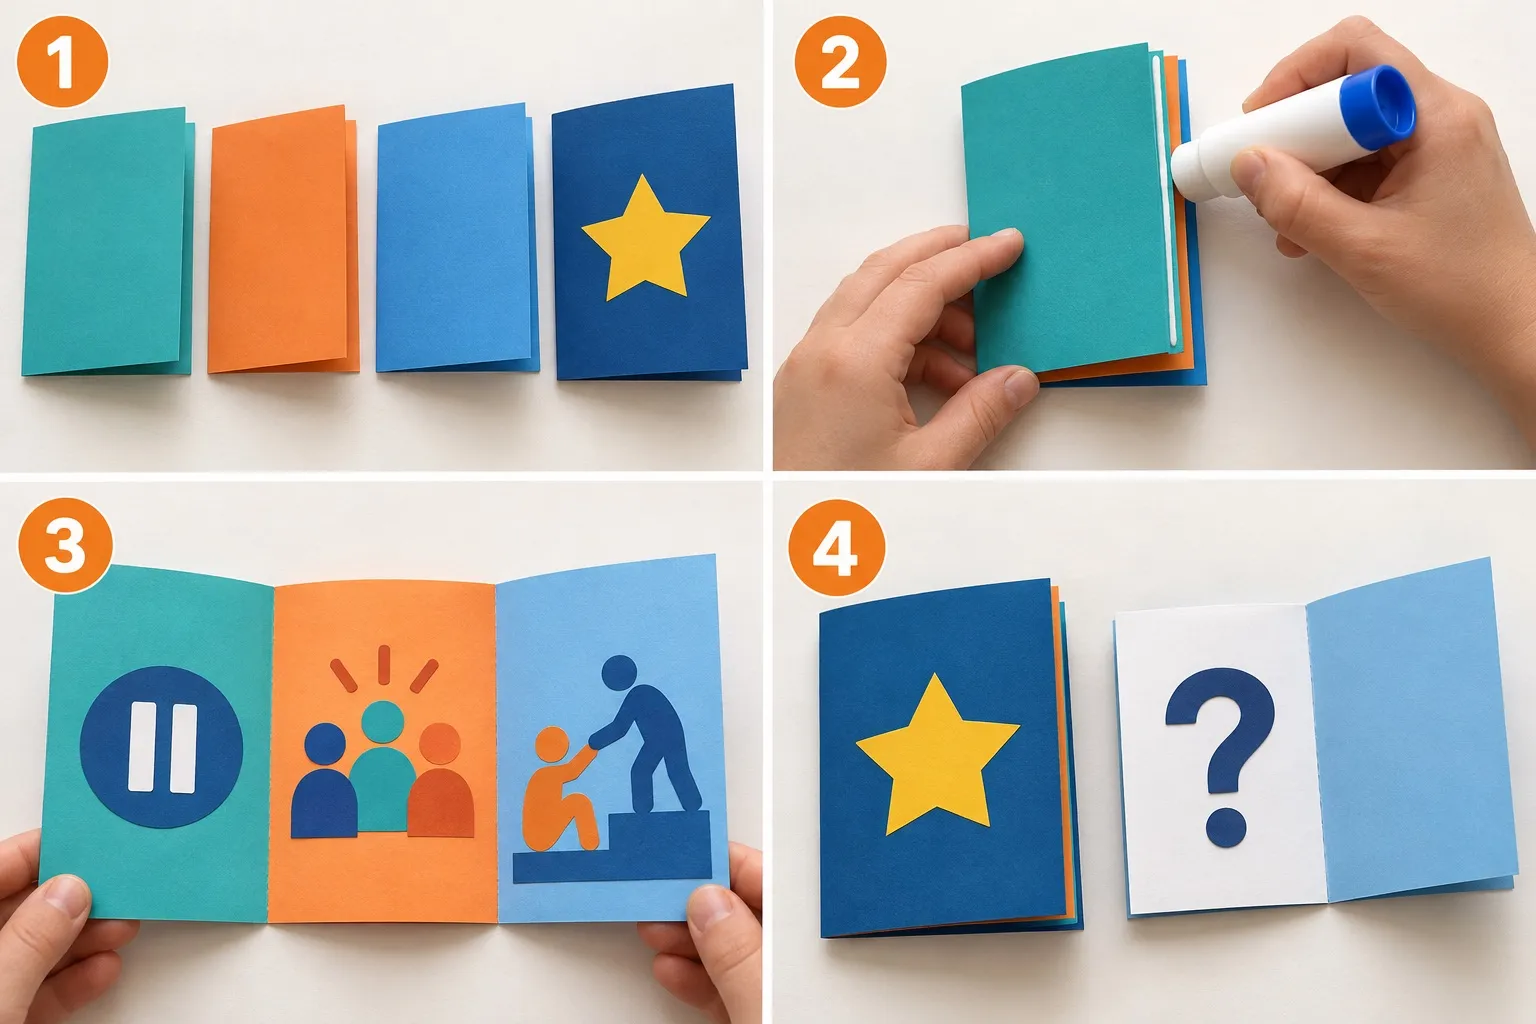
10. The pocket mission booklet
Suggested making time: 25 minutes.
Materials and preparation: 3 sheets folded in half, a folded cover, glue on folds and broad drawing spaces; no stapler is needed.
Make it in 4 stages
Fold the sheets in half and make a cover of the same size.
Glue a narrow strip along the folds to join pages, leaving them easy to open.
Use one page each for a decision, sharing, help and a new example; draw symbols rather than personal records.
Decorate the cover with a star and revisit a page later to explain a new choice, not collect a reward for silence.
Try the idea: After a few days, change the context from game chat to a competition form and ask which idea still applies.
Observe understanding: Record a brief explanation and support needed, not a public score or a claim of complete digital protection.
Important limit: The booklet is an original classroom aid, not an identity document, official certification or a copy of another provider’s passport.

Original tutorial illustration: stages 1–4 — The pocket mission booklet.
A 40-minute workshop that leaves time to think
Use 5 minutes to introduce one fictional situation, 15 to make one object, 10 to practise different responses and 10 to explain a changed example and tidy up. Prepare cutting in advance if it would consume the conversation. This is a flexible schedule; taking longer to draw must not be mistaken for poor online-safety understanding.
Check learning without a quiz score
Observation | Useful note | Next step |
|---|---|---|
Chooses an icon without explanation | Needs a modelled example | Think aloud, then offer a simpler choice |
Explains with a reminder | Understands in the current situation | Change one detail |
Transfers the idea | Explains in a new context | Revisit later without claiming mastery of every risk |
Accept speech, drawing, pointing or an adult scribing the child’s explanation. Offer high-contrast outlines and larger pieces; do not rely on colour recognition. Let learners observe before participating and avoid surprise role-play involving an actual child’s private experience.
If a real concern comes up
Pause the group activity, listen calmly and help the child reach an appropriate adult through the school or family support route. Do not make them repeat a distressing story for a demonstration or gather evidence in front of peers. A trusted adult can organise protection and reporting without treating the child as responsible for preventing every harm.
Questions families and teachers ask
Must we make all 10?
No. One carefully chosen make, explanation and later revisit is more useful than rushing through a display collection.
Can children use their real passwords or photographs?
Use invented information and simple drawings. Do not test password strength by exposing a family secret.
Do these crafts replace parental controls?
No. Combine learning with suitable accounts, device settings, adult support and the service’s age conditions.
Can we share photographs of the finished work?
Check the image for names, contact details and identifying backgrounds. Apply the school or family’s permissions before sharing; photographing an object does not automatically remove privacy concerns.
For a structured teaching approach, see our primary classroom activity guide and family online-safety games. Schools can ask Cyber Sqool about an appropriate learning session.
Sources, images and originality
Primary references checked on 30 October 2026: KnowBe4’s children’s resource collection, eSafety’s child-friendly help guidance and NSPCC’s guidance on children’s images. They inform general context; all 10 makes, scenarios and observation tools here are original editorial proposals. Illustrations were generated for this guide and reviewed against the steps; they are not photographs of tested classroom outcomes or an endorsement by those organisations.